This post is the second part of a series on old lamps. The first was painting; this one will show you how to rewire an old lamp.
Disclaimer: Some people don’t want to tackle lamps and that’s okay. Truthfully, if I didn’t have my handy Mr.H.C. handy, I might not have tried it either. Safety first! If you are hesitant, don’t try this at home. :-)

For this project I bought the kit that included a new lamp cord; my local hardware store actually had more selection of lamp repair parts than the big box stores.
If you don’t have a lamp to repair, quickly run out to your favorite junque shop and get one. I’ll wait. Don’t spend more than $10 because you will have to buy a lampshade and that’s where you will want to splurge. (If you’ve tested your lamp and it works, that’s great! Maybe all you have to do is paint it or spruce it up. The last time I bought a lamp, we tested it at the store, it worked great, and three days later is stopped working. So…) Stop by a hardware store and buy a lamp rewiring kit, too. Then you can use all new parts.
I am making two assumptions here: 1. You have made sure that it isn’t just a burned out light bulb; and 2. You have unplugged the lamp from any electrical outlet. Okay, let’s get started.
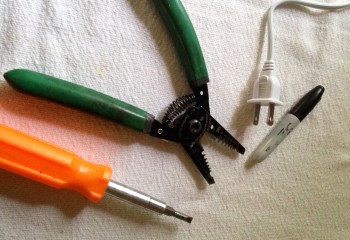 You need a basic screwdriver, a wire stripper, a sharpie, and if you (or someone in your household) have a continuity tester you can use it, but it isn’t necessary. The goofy looking tool is a wire stripper. We’ll look closer at it later.
Let’s review Tip # 2 from the last post:
Tip # 2. When taking apart a lamp, especially if you are doing this for the first time, remember how it goes back together. Put all your parts together in a big tin can, or place them somewhere in a line to help you remember what washer goes on what nut.
I was very careful to keep all the pieces together in a tin can, but still, I lost a nut… Luckily nuts are easy to come by in this house…
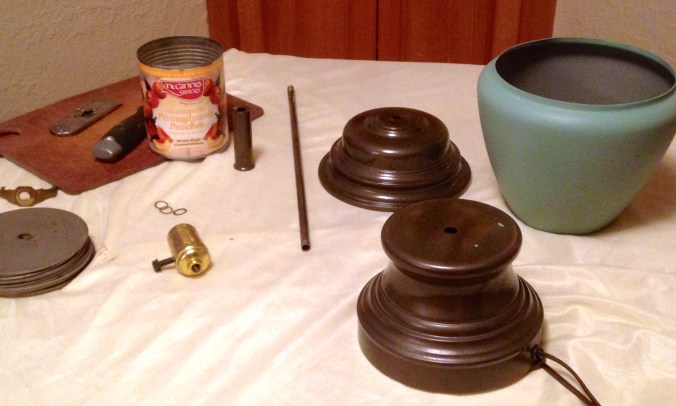
Mr. H.C. is providing the technical expertise for this post. (That’s one reason I’m writing it: so I’ll have a written record for myself so I can go back and look it over without having to bug him about every little thing.) One other thing: sometimes rewiring requires three hands. See if you can find a spare one around the house somewhere…
Tools and Basics

First let’s look at sockets. You can buy them as a push switch, a turn knob, a three way turn knob, and most of them have a little pull chain option if you’d like to be very retro. It looks like this in the package, but comes apart into 4 pieces. If you are taking the lamp all apart to paint it, you should just replace everything old with new.
Here are the 4 pieces of the socket: the base, the cover or shell, the cardboard insulator, and the socket/switch.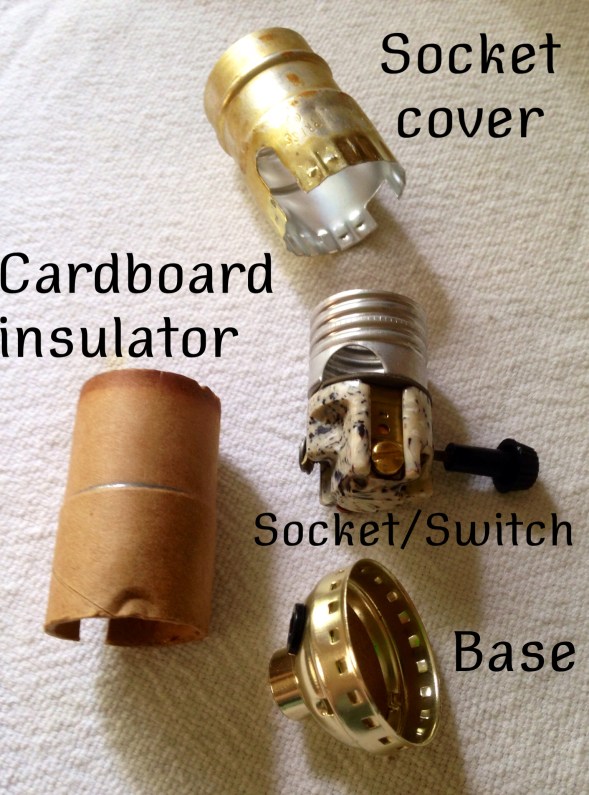
The new one will come in pieces; the old one on your lamp will have to come apart. On the shell, usually next to the switch, is some unreadable writing. It says Press. You are supposed to be able to press the cover in and release it from the base. Sometimes it works, but if the socket is old, it could be corroded or electrified together, and you may have to press and pry with a screwdriver at the same time.

This is the new socket/switch, so there is no wiring attached to it yet.

Don’t you hate it when DIY posts have photos of clean hands? Yep, so do I.
Let’s take a break for a minute and examine the socket/switch. In the left photo the screw is silver — this is the neutral screw; on the right, the screw is brass — this is the positive, or hot screw.

This wire is marked which side is the hot wire. This wire is new and the tips are nicely soldered together.
Lamp cords are made of two stranded wires, the neutral and the hot wires. The hot wires must be attached to the hot screw and the neutral wires must go the neutral screw. Lamp cords generally aren’t marked as to which side is which; when you take off the wire from the hot screw, it might be helpful to mark that side with a sharpie or nail polish — something to let you know which is the hot wire. If you have a handy dandy continuity tester you can use it here, but there are other ways to determine which is the hot wire. See Tip #1.
Tip # 1: The plug on a lamp cord has two prongs and one is larger than the other. This is the neutral or ground prong. If you straighten the wire and follow the cord up, that section of wire is the neutral wire. Conversely, if you follow the section of wire up from the smaller prong, that’s the hot wire.
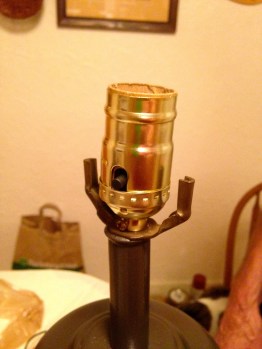
The U-shaped piece of metal under the socket is the base for the harp which holds the lampshade. This is the American style of lamp shade holder, so it’s likely your lamp has one. Don’t forget to put it back on before the socket.
The cord goes down through the lamp in a hollow metal tube with threads on each end. At the base of the inside of the lamp tube is a nut holding the whole thing together. The top of the lamp tube is screwed into the base of the socket we just took apart. Consequently, when you unscrew the socket base, you might just unscrew the whole tube. Yes, I’ve done it. (If you are taking it all apart to paint it, you’re going to replace everything anyway, so don’t worry — this is only tricky when you are just repairing a lamp.)
Putting it Back Together
Put the cord through the hole in the bottom of the lamp, then through the threaded tube, putting the lamp pieces together as you go. Every lamp is different; the lamp I painted had three pieces and one long tube that connected them all inside. Many lamps are just one piece with a short threaded tube just below the socket. Make sure to leave plenty of wire out the bottom of the lamp to plug it in. After the wire is all the way up the tube and into the base of the socket, you only need a few inches of cord.
Tip # 2: Mr. H.C. says I can’t leave this out: When the base of the socket has to be reattached to the lamp, twist the cord in the opposite direction — counter-clockwise — about six times (just by hand). This is to keep the cord from kinking while you are screwing the base of the socket into the lamp.

This cord has the hot wire marked; the strands of wire are nicely soldered, so they just have to be curved around the correct screw and the screw tightened. Also note the underwriter’s knot in the cord.

Lamp cord is generally 18 gauge, and if you look on the wire strippers there are numbers that correspond to the size of cord to be cut.
Once the cord is through the socket base, and the socket base is back on the lamp, you have to split the two sections of cord and uncover those strands of wires. This is where you need the wire strippers. The goal is to just cut through the plastic of the cord and not cut any of the wires. Put the cord in the correct notch of the wire strippers and squeeze gently; then with an upward motion just peel that plastic off.
Tip # 3: Each and every one of those strands is important. If you cut any of them accidentally, move down the wire a bit and try again.
After you have prepared the wire ends, split the cord a little further and tie a knot in the cord so it won’t slip off the screws. There is a cool knot, called an underwriter’s knot that is generally used. It looks like the symbol for infinity, and See Jane Drill has a great video on how to learn to tie it. It’s simple and it looks like this.

 If the strands of wire are not soldered, they have to be neatly twisted together before they can be wrapped around the screw. Twist them together in a clockwise fashion and bend the wires into a half-circle that will fit easily around the screw. Once you have the wires in place with the correct screws, tighten the screws, and put the socket back together. Remember in Tip # 2 above we talked about how important those strands of wire are? Here as well — if any stray wires end up sticking out around the screws, unscrew them, retwist the wires, and try again. (If you are using a new cord, chances are this is already done for you — another reason to buy the whole kit and just replace everything.)
All that is left is to fit the harp over the harp base, choose a lightbulb (that is a feat in and of itself these days…) and go buy a lampshade.
And now I will confess that I wish I had written this post before I started. And one more thing … if the lamp flickers when you turn it on, don’t use it. Turn it off and seek electrical guidance from a local lamp guru, an electrical expert, a polished professional, a guiding light in the field of lamp repair. Okay, sorry. Mr. H.C. says I shouldn’t make jokes about this being a shocking experience.
If you need more information or my instructions are as clear as mud, here are a couple of web sites that go into great detail (they also use photos of clean, nicely manicured hands): How to Repair a Faulty Lamp for Dummies or Family Handyman’s How to Repair a Table Lamp. But again, I think totally rewiring is easier than repairing. Just my opinion…
And my lamp? I totally changed my mind and went with a creamy linen shade. I don’t always like to get white shades because my walls are mostly off-white and I don’t want the shade to disappear against the wall. But the mirror behind the lamp changes all that. What do you think?







 Fields of wildflowers smiling at the sun.
 Sun rises early over the distant hill.