84. Begone Ugly Windows

We have a new window in the mudroom.

It is not like the gorgeous original kitchen windows that we spent three months painstakingly restoring.

Restored wood windows

No, this window is a bottom-line Andersen window, on sale from Home Depot this past week for $225.

American Craftsman window from Home Depot

We have spent the last year — on and off — looking for old double hung windows with real muntins that would fit this 48″x48″ square opening. No dice. No windows either.

This is a perfect example of the drafty, ugly aluminum windows -- this one is going to be gone SOON as well.

This is a perfect example of the drafty, ugly aluminum windows — this one is going to be gone SOON as well.

The problem is that some of the windows in the cottage are original, and some were replaced in the seventies with aluminum frame windows that, uh, have zero charm. (Zero R-Value as well.) We are keeping the wood frame originals, but that leaves us with having to replace the others.

We just couldn’t spend any more time looking for old windows that we could re-do. It was time to upgrade that old aluminum window that was cracked and didn’t work. I could spend the rest of this post lamenting the loss of craftsmanship in the modern world. Why is everything affordable made from plastic vinyl? And as much as I’d like to put in expensive Pella windows that are, you know, historically appropriate? It just isn’t in the budget; we went with cheap, and on sale for even cheaper…But Energy Star Efficient! And Made in the USA.

On an unseasonably warm October Saturday, we carted the old window out to the edge of the road, where someone will most likely stop and take it for the aluminum.

We put all of our junk out here by the side of the road with a FREE sign next to it. So far everything we've put out has been taken: a ladder,  old ceiling materials, an old light, a vacuum cleaner, and even the old kitchen sink...

We put all of our junk out here by the side of the road with a FREE sign next to it. So far everything we’ve put out has been taken: a ladder, old ceiling materials, an old light, a vacuum cleaner, orange louvered doors, and even the old kitchen sink…

Alas, the perennial problem is this: What does this particular project consist of? Are we just trying to get a window in for the winter, so air won’t blow through the kitchen? Or are we going to take our time and replace the siding now, because that is in the long-range plan?

After several rounds of discussion, we decided to take the cedar shakes off and put white cove siding on the front of the mudroom. Mr. H.C. isn’t exactly happy about it; we’ve still got the kitchen AND the mudroom to finish, and here we are taking an excursion to the outside of the house.

Mr. H.C. frowning at the level.

Mr. H.C. frowning at the level. He frowns at his level quite often.

Of course, nothing about the mudroom is level or square. This photo sums up pretty well the angst that goes with putting a level on any wall or sill or floor of the cottage. It’s always a bigger job than expected — Mr. H.C. had to take off the horizontal board and cut off the studs three-quarters of an inch on one side for the window to fit in the frame.

At the end of the day, the window is in...

At the end of the day, the window is in…

But at the end of the day, the window was in; I relented and admitted that it didn’t look too bad; and the rest of the outside walls are (almost) ready for siding.

And we got to relax and enjoy the fruit of our labors for 10 minutes until it got dark...

And we got to relax and enjoy the fruit of our labors for ten minutes until it got dark…

83. The Mudroom Demolition

The mudroom has some problems. Even its name assumes trouble — Mud Room.

But let’s not sugar coat it, or white wash it; it is the entryway into our beautiful kitchen from the muddy outdoors. No just walking inside from a warm garage — this here’s the country! And for most traditional houses, the mudroom is not the main entry into the house, but guess what readers? The cottage is not the traditional house…

Mudroom, Before

This is just one short five foot wall on the left side of the entry way into the kitchen. It just about shows perfectly the hodge podge that the mudroom is…The gray shadow on the siding also showed us where the original door was.

The mudroom was originally the front porch to the cottage; when Joe and Clara renovated in the seventies, they enclosed it. But being a lowly front porch, the concrete floor is on, well, the ground — no footers, no basement, maybe some gravel, although that’s doubtful. So the concrete floor has some serious cracks. No Problemo! We just put down some rebar, pour some concrete, smear on floor leveler, and tile over it!  :-)

Joe and Clara used cedar shakes to cover the walls. This means that under the cedar was a mishmash of old siding, holes where doors used to be, holes where an air conditioner used to be, and just plain holes. On the plus side, we now have six boxes of cedar shakes just itching to be a glamorous cedar chicken coop!

Did I mention that the electric panel box is out there too? Joe ingeniously made a hidden door of cedar shakes to cover the box and all the wires, but now that we’ve taken off the shakes, there is just an ugly plywood door that isn’t acceptable for much of anything. Well, maybe for a glamorous chicken coop…

The ceiling was plastic vinyl wainscot panels that Mr. H.C. made short work of taking down. Clara put twenty dozen hooks in the ceiling and hung her baskets from the ceiling. It had a certain charm, but I was always afraid a bird or a squirrel would jump out from one of those baskets and land on my head…

The front wall under the window is a mixture of concrete block and bricks. It is the back wall of the brick planter that is out front. I planted some test flowers in it this spring, completely sure they would die and I could say, “See, nothing will grow here. It doesn’t get sun, it doesn’t get water. Let’s take it out.” And of course, the white impatiens and red coleus thrived. (We did have a wet summer…) So the planter is staying for now. Oh, and there is a chimney. It takes up one corner, and it looks like someone who didn’t know how to mortar bricks together did the mortar job. Probably my grandfather…

We have big plans for this small, narrow room: a wood stove on an elevated platform, a rocking chair, French doors that will lead you into the kitchen, and this lovely DIY combo of bench and coat rack. We already have the floor tile and the French doors; we purchased them both eons ago at Habitat for Humanity Restores. The wood stove will be coming down from our city house basement; the ceiling will be the same beadboard as in the kitchen. But first things first:

20130929-152635.jpg

78. random thoughts on painting wood (from a carpenter’s wife…)

I’ve been painting lots of wood lately. Doors, cabinets, woodwork… I love paint. I love color. But I also love wood.

Paint and color and wood can co-exist, but finding that perfect balance is difficult. Rooms with too much wood need color for drama; rooms with too much color scream out for wood to give rest to the eyes. It’s that perfect balance that makes us all sigh and sit down in comfort.

Mr. H.C., the carpenter, hates to paint wood. “When wood is painted, it’s painted,” he says. “And only a huge effort can get it back to its original state, and even then, it might not look good.” (For a very funny post on men and painting wood, read The Decorologist’s post, Why Men Fear Painting Wood)

When I was about fifteen, my mom and dad undertook the making over of the basement in our fifties ranch house. They were on a shoestring budget, but they wanted a room where their teenaged daughters could hang out with their friends. It was a gigantic room — just putting carpet on the floor, a dropped ceiling, a big comfy couch, and room dividers at the ends probably put them over-budget. So Mom was gathering furniture from every attic and garage that she could find. Two of her scores were pretty little washstands. She painted one late-sixties orange. As she was preparing to paint the other (late sixties chartreuse) I stepped in. In my fifteen-year-old wisdom I said, “Mom, why are you painting that pretty washstand? You should never paint wood furniture.”

She gathered together all her parental wisdom and said, “When you’re older, you’ll understand.”

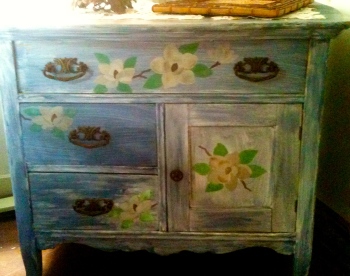
In the infinite circle of life, twenty-five years after she painted it chartreuse, I inherited this charming little washstand. It was still chartreuse. I took it to the local stripper and told him I would pay him well if he could take that paint off for me. A few days later he called me back. “Was this painted in the late sixties?” he asked. “And then maybe antiqued?”

pretty washstand painted in nineties blue stenciled with nineties flowersIt absolutely was.

“Yeah,” he said. “That stuff just can’t be stripped off.”  He sanded the door and then gave up. His advice? “Just paint it. It’s only poplar.” So I painted it early-nineties blue and stenciled it with early-nineties flower stencils. And now, twenty years later, it is relegated to holding craft supplies in my upstairs craft room that is not open to the public.

So many pieces of beautiful old furniture ruined.

And so I learned — Don’t paint it, if it can never be reclaimed.

Truth be told, my mom paid her dues for painting all that wood furniture. (She also painted a carved wooden love seat and several oak pressed-back chairs orange, as well as two beautiful rattan easy chairs chartreuse!) When the trend for country furniture started in the late seventies, she and my dad were early adopters. (The first Country Living magazine was published in 1978  — probably a direct result of all that bad furniture painting and colors of the sixties and early seventies!) They bought beautiful old furniture at auctions and sales, stripped it, and refinished it with natural oil finishes. When she found this  primitive hutch in Uncle Judd’s basement, it was painted a lovely shade of pink and was storage for paint supplies  — a fitting tribute to what often happens to painted furniture…

primitive walnut hutch

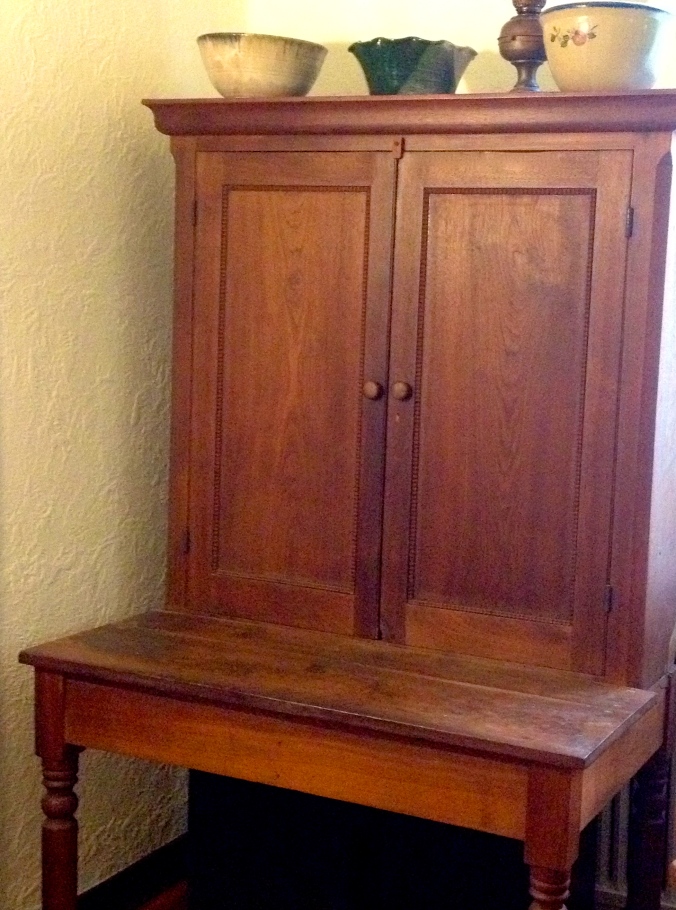
Aunt Sara and Uncle Judd were astonished when my mom picked that particular pink piece of furniture. Mom dragged it home (it comes apart in two pieces) and she and Dad lovingly restored it. Mr. H.C. thinks it is walnut. It is a bit quirky, but I love the fact that it is a one-of-a-kind antique, passed down through family, that many hands have touched it, restored it, made it their own. I love the circle that life is.

I understand wanting to make a piece of furniture, or a house, your own — individualizing it. That’s what we are doing with Apple Hill Cottage, after all. DIY is good. But what happens when the DIY goes bad? Let’s face it, that little washstand  I painted and stenciled? I didn’t do such a good job of it. AND fashions change. The turquoise of today will be tomorrow’s outdated color. The white cabinets of today will be dated in ten years.

This is the classic pressed-back chair, and very similar to the one I painted glossy forest green...

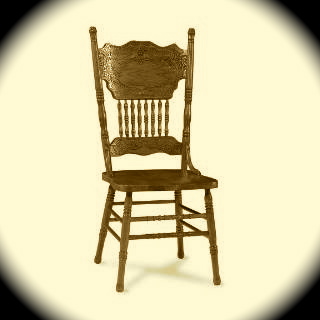
This is the classic pressed-back chair, and very similar to the one I painted glossy forest green…

Recently I read a post about “reviving an antique Windsor chair” by painting it blue. I laughed to myself. I did that once. I painted a lovely oak pressed-back chair glossy forest green; BUT I only painted it because it had already been painted orange. (Yes, by my mom — it sat right next to that orange washstand in our basement.) And it was never going back to its beautiful oak original beginnings.

All those rungs? All that carving? All that glossy paint? I repeat:  Don’t paint it, if it can never be reclaimed.

…Which translates into the following rules suggestions for painting wood:

  • Do not paint any family heirlooms.
  • Do not paint anything that might be valuable the way it is.
  • Do not paint anything that has carving or curves or moulding that would be hard to sand back to its original condition.
  • Do not spend any more than $35 on any piece of furniture you are planning to paint. (Well, maybe $50 if you live in a city…)
  • Try to find pine furniture (or poplar) for painting. Or better yet, find something that has already been painted.
  • Paint only furniture that you are willing to refinish or throw away, when your mind (or the fashion) changes.

And our minds change frequently, don’t they?

With all that said, I’m looking for a few cheap dining room chairs to paint….

This lovely painted pressed back chair is from the Irish Lady’s Blog. If you live in Texas, you could drop by her shop and purchase this pretty chair. It looks lots better than the one I painted glossy green (but that’s because glossy forest green is currently out of fashion…)

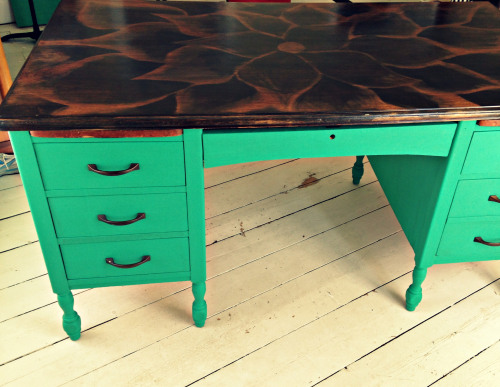
Emerald green, however, was Pantone‘s color of the year this year. And Tricia at the Domestic Fringe just posted this DIY painted desk. She found the desk set out for the garbage — in which case, it is totally OK to paint. Especially when you can do this to the top:

Desk1

To find directions on how to do something like this to the top of YOUR old desk, see the post on DIY: Trash to Treasure desk renovation..

I have an ugly wood desk in my not-open-to-the-public craft room upstairs. I would love to have that flower top on it… And I could paint the bottom a pretty, rust-colored orange… oh, wait. I can’t paint it orange! It belongs to Mr. H.C., the carpenter who hates to paint wood. But I do have a washstand that could stand to be painted…Maybe orange, huh, Mom?