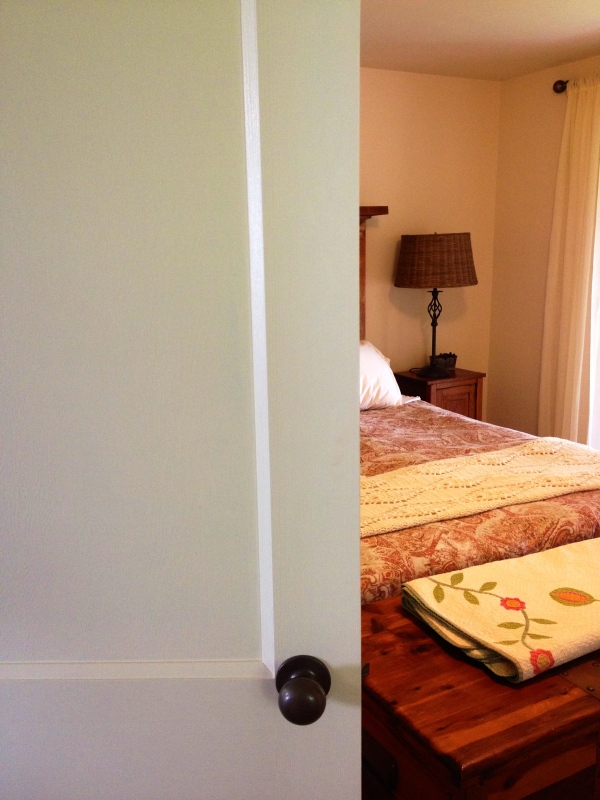
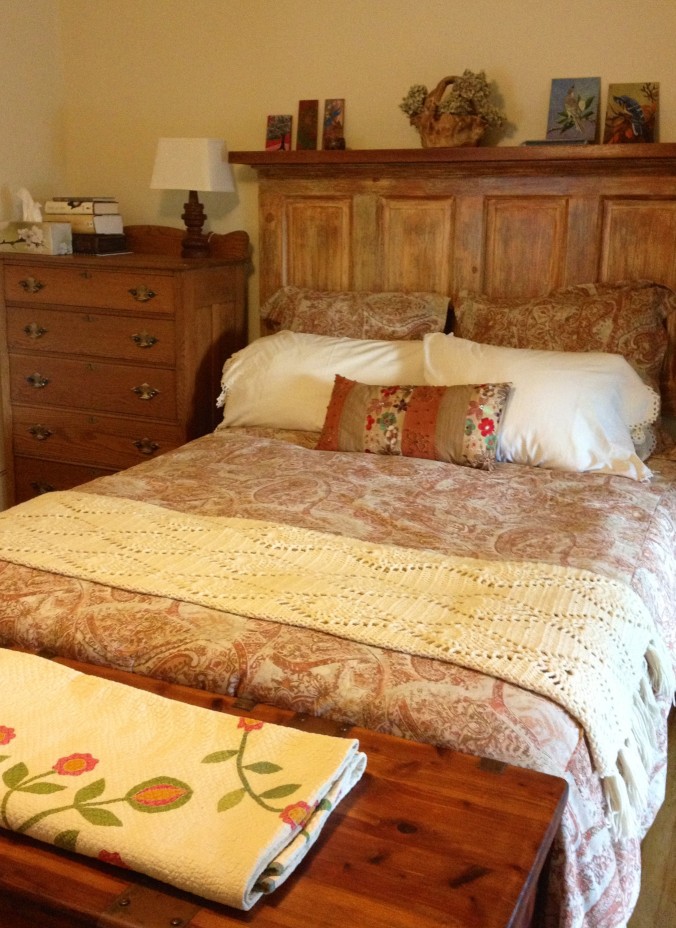
The yellow bedroom is yellow no more. Even the closet has not a vestige of yellow left! We are mulling over a new name — just “the bedroom” doesn’t adequately cover its transformation. The change has been slow. I’ve been working on it by myself when unskilled labor is not needed in the kitchen. Taping and priming and painting the woodwork,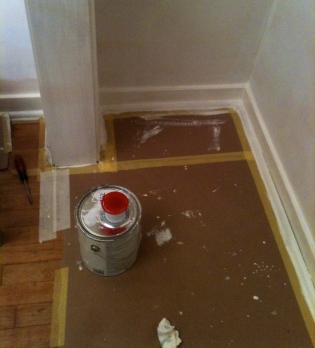
 patching the walls, taking off doors, priming and painting the closet, sanding and painting doors… It all sounds impressive, but it wasn’t. It was tedious, hard-on-the-poor-old-knees-and-back work. Mr. H.C. stopped work in the kitchen long enough to help me do the actual painting of the ceiling and the walls. There are still some minor embellishments to be added — I’m working on the bedskirt, the bed will be getting some fancier pillows, and there are still pictures to hang on the walls — but it sure looks amazing to us! Come in for a peek —
What I really like about this room is that mostly we’ve used antiques and family collectibles that we already owned. The dresser, the metal shelf and the quilt belonged to Clara, Mr. H.C’s mom who slept in this bedroom long before we did; the nightstand belonged to Mr. H.C. when he was a little boy and still known as Mikey; the cedar chest was made by Pa — my grandfather who first built the cottage; Dad made the little wooden lamp, and the mirror and the bookstand under it came from him as well; my mom painted the birds. And Diane and Emily, my sister and niece gave us the footprint for the colors, the design, and ideas on how to use the furniture.
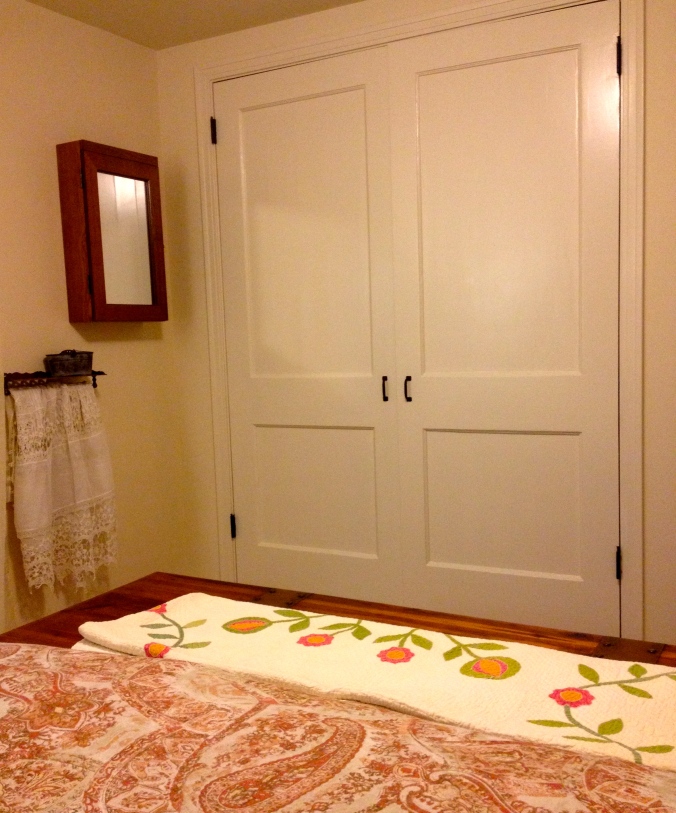
That’s Clara’s appliqued quilt on the cedar chest. She told us it was probably the most valuable thing she owned. We’ve found the date on it, but it is embroidered in white on white and it’s hard to read — 1882 or 1932 — we just aren’t sure. Clara gave me a whole bag of vintage linens before she died, because she knew I love them; the two pillowcases on the bed and the lacy cloth hanging on the shelf are part of her collection.  The closet doors were old fashioned paneled doors that Mr. H.C. found at Construction Junction for $30 each; we were delighted to get rid of the boring sliding doors that didn’t slide. The new/old doors were in my sanding shop for several days (five coats of paint and shellac as the bottom layer!) and then primed. Mr. H.C. hung them, and unlike usual, we painted them after they were hung. The handles were left over from our kitchen cabinets. If you are reading about this bedroom for the first time, its transformation was planned by the online decorating company, ReHabitat Design and you can read about the stages in posts 37 and 43.
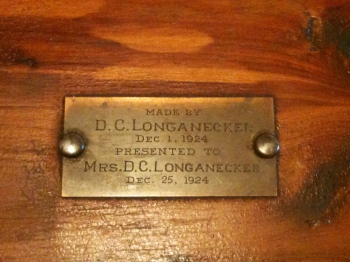
Pa — my grandfather who built the cottage originally — made the cedar chest as a Christmas present for my grandmother in 1924 — he even put a plaque on it. Before we brought the chest down from our city house, we were skeptical whether it would fit. After we put it at the foot of the bed, Mr. H.C. said, “This actually makes the room seem bigger, dont’cha think?” Yes, I do.
The headboard is made from an old door that Mr. H.C. scored (also from Construction Junction) for fifteen dollars. He cut it off at five feet to fit our queen-sized bed, and I sanded it. The inspiration for this is from the website Hometalk: I really liked the look of the door on this website, but doors have different personalities after sanding, and I had to respect what it was. I fooled around with paint and glaze and came up with this. It isn’t exactly what I had envisioned, but I was trying to be open about this project, and we both like how it came out. 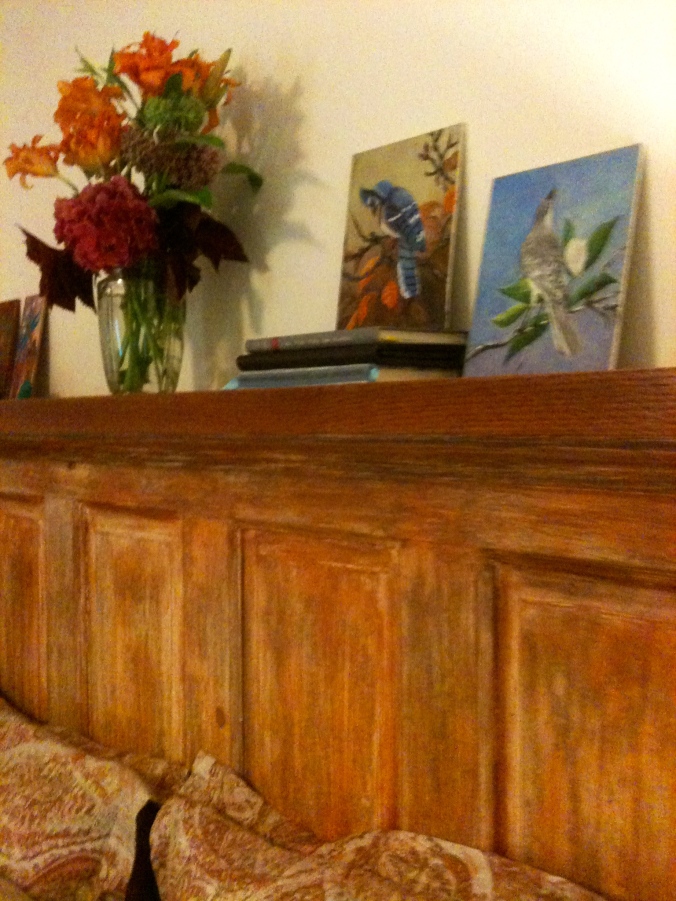
The oak shelf on the top was taken right off the wall in the living room where it once was Clara and Joe’s mantle. It fit perfectly on the headboard; I think they would be pleased. And my mom painted the birds that sit on the shelf. They used to be in the bathroom in the house where I grew up; I love them on this headboard shelf.

This mirror and little bookshelf/table under it came from my dad; he also made the small wooden lamp on the dresser.
Sister Diane made the hand-crocheted afghan that’s on the bed for my mom many years ago. I bet she wants it back now. :-) And the pretty little carved basket on the headboard shelf was a Christmas present from sister-in-law, Rita.
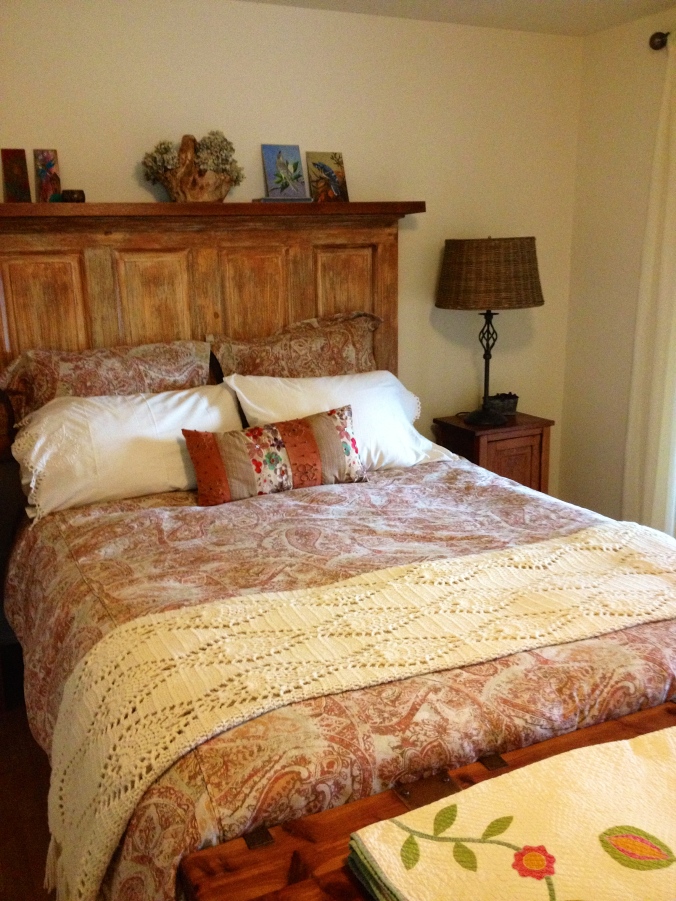
 These new finials dress up Clara’s old curtain rod, which I spray painted eons ago. The finials were new from Bed Bath and Beyond and they didn’t fit the old rod. But Mr. H.C. cut a piece of wood to fit in the rod and added a couple of screws — Voila! I think he can fix anything… And just in case you forgot what the room used to look like…

Factoids: The wicker lampshade, the duvet cover and shams, and the curtains are from Pottery Barn. The two other lampshades are from Target. The curtain rod finials are from Bed, Bath, and Beyond, but don’t count on them fitting any other curtain rod except the ones that are sold with them! The rug on the floor was from Rug Depot a few years ago, but it is still a great place to buy rugs and runners. And the little art on the left of the headboard is from a great little Etsy shop, McWissenville. The walls and ceiling are painted with Benjamin Moore Winter Wheat (232) matte; the trim and closet doors are painted the same shade we used in the kitchen — Sherwin Williams Steamed Milk (7554) semi-gloss. The paint and glaze for the headboard came from Sherwin Williams as well; the color is Brandywine.


What a beautiful room you have made! I love that everything is hand made and/or has a connection to someone in your family. It looks gorgeous.
LikeLike
Thank you so much. We love it too. It’s been a year of hard work and we have two rooms almost done. It’s a good thing it’s a small cottage! Only three rooms to go… And the porch. And the roof. And the garden. One thing at a time, yes? Thanks for the lovely comment!
LikeLike
one thing at a time and remember to enjoy every minute – well, perhaps not EVERY minute – some of those jobs can be pretty hard going, but most of the minutes – and all of the tea breaks when you stand back and congratulate yourselves on what you’ve achieved!
LikeLike
Thank you so much for this DIY. Did you do a queen or full bed? I would love to get measurements if you have them. About to redo my preeetn’s room and this will be great for it. Also, do you have a DIY on the cute headboard?
LikeLike
Our bed is a queen; we just measured the bed and cut the door a couple inches longer on each side. We also tried to center the panels, and it worked out perfectly. As far as a DIY post on the headboard, I’m afraid it would be boring. I didn’t have any instructions, and mostly I just messed around with sanding both sides and trying different shades of paint. I did use the piece we cut off as a practice board though and that was very helpful.
We just screwed it on the wall instead of adding legs like many headboards have.
Thanks for visiting!
LikeLike
It is looking amazing! I can’t wait to see that headboard-it looks fab, from what I can see. You’ve done so many room redos lately between your other rental and this one-you must either be exhausted, or in decor heaven (or a bit of both?) =)
LikeLike
How amazing are you two. Bravo for repurposing so many items. All your cherished family keepsakes give the room tons of charm. I especially like your new closet doors and headboard. Your Grandpa was so smart to put a plaque on Grandma’s Christmas gift, such forethought.
LikeLike
Yes, I think he was so proud of it because, though he was a mutli-talented man, being a carpenter wasn’t one of his special skills. He must have thought it deserved a plaque!
LikeLike
Wow, what a transformation! It looks fantastic. It must feel good to see it done (until you want to change something else, because that’s usually how it is with a home) :)
LikeLike
I think we have to get the other rooms done before anything changes! And by that time I might be to old to care! :-)
LikeLike
This room is really beautiful! Thank you for taking the time to explain the meaning behind all of the special pieces in the room! The headboard turned out really nice…I like it! And the closet doors are beautiful! The whole thing just came together so well! Thank you too, for including the information about where you purchased the products and the link to ReHabitat Design! What an awesome site! :) I’ve already bookmarked it, and I’m going to be checking it out for more ideas!
I hope you can take a moment or two, and just relax in this beautiful room! Great job!
LikeLike
Oh thank you so much for all the kind words! The original idea behind doing the bedroom at the same time as the kitchen was so we could just go in and shut the door to the mess! Turns out they are finished at about the same time. Hah, but the rest of the house is still a mess, so it will still work! Now if I can just get my husband to keep his nightstand this neat! (I can’t blame it all on him, though, my nightstand has never been known for neatness either!)
LikeLike
Looks wonderful, love it all, especially the headboard. Its nice there are so many memories there.
LikeLike
Do you like Mom’s birds without the frames? I do — I was just taking them out of the frames to paint the frames a different color, and inspiration (and laziness) took over!
LikeLike
The room is awesome. I have an old cedar chest in my bedroom that looks very similar to the one in your photos. I don’t know the entire history of my chest. I’d always assumed that it was manufactured in a factory somewhere. I’m now wondering if it might possibly be handmade.
LikeLike
I’ve been casually researching it on the internet — the style with copper bands and legs was popular in the 20s and 30s. There was a company in PA that made them — look on the bottom of the chest. My husband thinks perhaps Pa made the one we have from a kit, but we don’t know for sure. I’m thinking Montgomery Wards probably sold kits, but I can’t find that for certain with just a few cursory searches…
LikeLike
Great video! This is exactly the bed I’ve envisioned in my mind but had not found exactly what I wanted. I never thought of building one from recycled doors! Thanks for the great video and new ideas for constructing furniture pieces from recycled products!
LikeLike
Once again ..you are so creative. Your room looks amazing!! I used to do all kinds of fun DIY projects, then I had three kids and that kinda slowed me down. LOL
LikeLike
Thank you! And just as a reminder, kids are WAY more important than renovating a house. :-)
LikeLike
that’s just almost too adorable for words. Yet another example of white walls and backgrounds not being boring! Love the splash of color they add with the dishes in the hutch!
LikeLike
I love your idea on the West Elm headboard, I want to do the same, so I am using your photo as my inspiration. Can you tell me with the headboard raised now, how tall is it now? With it being raised, is the un-tufted lower part of the headboard exposed a little now or does the mattress covers it? I’m still trying to figure out the dimensions so your feedback will be greatly appreciated. Thanks for your help!
LikeLike
Hi Cleber,
Thanks for your comment! We love this headboard; but we didn’t make it like a traditional headboard is made. We just hung it on the wall (with screws into the studs) above the bed. So we pushed our bed against the wall, marked where it stopped and noted how much room we wanted between the bed and the bottom of the door. We just left a couple of inches. Mostly we were concerned that it would be high enough so we wouldn’t bump our heads on the shelf! We didn’t have a formula. Ours ended up being 27 inches from the floor, but it totally depends on how high your bed is! Also we had those big pillows that would help cover any gap between the mattress and the bottom of the door. Hope this helps. Best wishes.
LikeLike